In the third edition of The Yoga Series, our simple Sun Salutation continues with the micro-movements and adjustments needed to unlock the full benefits of Banarasana and Adho Mukha Svanasana but please, let’s just stick to calling them High Lunge and Downward Dog!
And if you’re not into yoga, versions of these poses are frequently used in all kinds of workouts, from Pilates to post-run stretching routines to injury-prevention plans. Practising and mastering these moves will not only translate into increased flexibility and strength of the entire body but these poses are also fantastic at counter-balancing the tightness created in the hips from countless hours of sitting. They train the body to alleviate weight off the lower back.
Both of these poses stimulate the internal organs, increase circulation of blood and lymph and Downward Dog, in particular, alleviates lethargy & mild depression.
Remember that while yoga is for everyone, not all movements are for all bodies at all times! Avoid the High Lunge pose if you have a serious knee or spinal injury. Always work within your own range of limits and abilities.
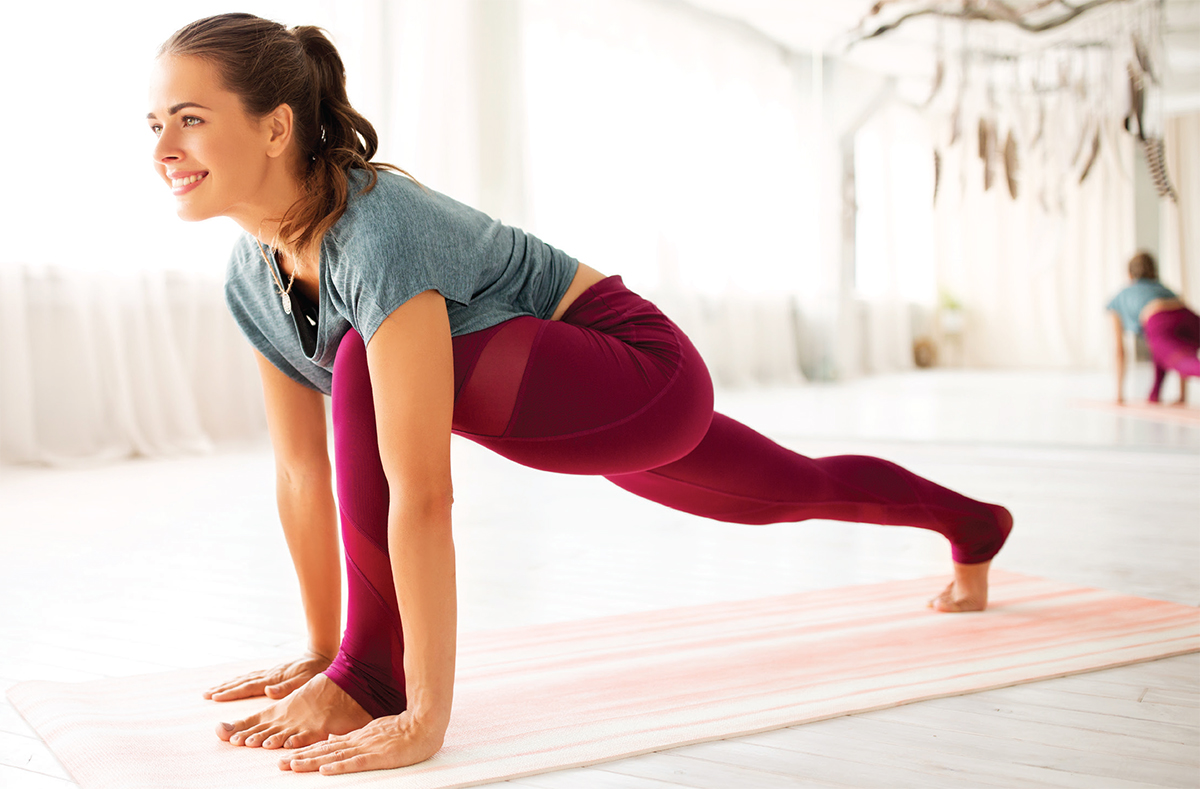
High lunge asana
I suggest having two yoga blocks ready to really enable space in our High Lunge Asana. Two small stacks of books work well too.
• Start with our previous Sun Salutation poses as described in previous editions of The Yoga Series - your strong Mountain into Swan Dive, folding forward into Uttanasana.
• Now bend your knees as much as you need to be able to touch the ground with your hands. Slide your fingers beside your feet, place the palms down and ground through the hands. Alternatively, grab your blocks and place your hands on them.
• Step your left leg back. Keep your feet hip-distance apart even as you step back into the lunge shape.
• Make your micro-adjustments to ensure your hips are straight and facing forwards
• Ensure that your front knee is stacked directly above your ankle or a little behind. Ideally, we’re looking for a 90-degree angle here but as long as your knee is not tracking over your ankle, you’re doing it right.
• Move your left foot back as far as you can while still maintaining balance. If necessary, place your knee on the mat. The ball of the foot should be pushing down and heel pointing skywards. Enjoy that stretch through the toes and sole of the foot.
• Check in to ensure your wrists are stacked directly under your shoulders, press into your fingers tips, and straighten your arms without completely locking the elbows. Ensure that the shoulders aren’t pulling towards the ears by micro-moving the shoulders backwards and downwards.
We don’t want a scrunched up feeling here - create more space by resting your hands on your blocks if needed.
• Elongate and stretch the spine by extending the crown of the head forwards and tail bone backwards. Keep your gaze down if you have any neck issues otherwise lengthen the neck and gaze forward.
• Powerfully engage the buttocks, abdominal and pelvic muscles to ensure that the hips aren’t hanging down.
• Try to remain in this position for up to five breaths while stretching and micro-adjusting to find that sweet spot in which Adho Mukha Svanasana feels both fierce and relaxing.
• Do not lose heart if your sweet spot feels worlds away. In yoga, a bit of effort goes a long way, just keep practising and you’re guaranteed to reap the rewards sooner than you imagine.
Downward-facing Dog
• Step your left foot back.
• Move your hands slightly forward from your shoulders, with your middle finger pointing forward and fingers spread wide.
Think about creating a suction cup in the middle of your palm by pressing through the outer edges of the palm, the base of the fingers and the fingertips.
• Create a spiral action in your arms by rolling your upper arms away from you and your forearms spiralling inwards. These movements are slight and hardly perceptible.
• Tuck your toes under, and on an exhalation, engage your lower abdominals by drawing the navel into the spine. Press through your hands and lift your hips back and up to bring yourself into an upside-down V pose.
• Keep your knees bent at first as you lengthen your spine.
• Slide your shoulder blades down your back while creating length and space across the upper chest. Keep the base of the neck relaxed.
• Let the head hang freely so there is no tension in the neck. Gaze is towards the feet.
• Maintaining length in the spine, ‘walk your dog’ by alternately bending and straightening your legs. Eventually bringing both heels towards the floor. They do not have to touch the floor.
• With each exhale root down firmly with the hands, with each subsequent inhale send the hips back and up.
Hold for anywhere from a few breaths to a few minutes.
• Bend your left knee and step forward. Change sides and practice High Lunge Pose with your right leg stepped back.
Modifications and Variations in Downward Dog
WRISTS
If you have wrist issues you can use a yoga foam wedge under your hands. This will decreases the angle of extension at your wrist.
Another great wrist modification is to place two yoga blocks against the wall. Then do Downward Dog facing the wall with your hands on the blocks. This modification makes your arms ‘longer’ and can help you find more length in your spine.
BACK
If your back rounds while doing Downward Dog, bend your knees and work to find the natural curves of your spine. By bending your knees you will be able to tilt your pelvis more (stick your sit bones up towards the ceiling), and then find more length for your spine. If possible, practice in front of a mirror to keep an eye on your back.
ELBOWS
It is essential not to hyperextend in your elbows. Hyperextension can lead to damage in your elbow joint over time and will prevent you from building strength in your biceps and triceps in Downward Dog. To help prevent hyperextension, squeeze your wrists towards each other (without actually moving them closer – this is more a feeling than an action). This will encourage your elbows to ‘unlock’, or to bend slightly.
SHOULDERS
If you have shoulder issues you can modify Down Dog by using the wall. Stand your leg-length away from the wall. You can sit down on the ground and bring your feet to the wall to measure this.
Then stand up, face the wall, and place your hands on the wall in line with your hips. Push your hands into the wall and bring your back parallel to the ground. You may need to adjust how far away your feet are from the wall to get your back parallel to the ground.
“It is often repeated by yoga teachers, and in yoga texts, that women should never do an inversion when menstruating. The story told is that when you position upside down the bad blood that is being expelled by the menstrual cycle reverses flow and that this can cause health problems.
This myth dates back to a time when men decided what women should and should not do, with no reference to facts or science. I have spoken to several doctors about this and it has absolutely no basis in medical science.
If you don’t want to invert when menstruating, that’s up to you. If you want to, that’s also up to you. Inverting, just like everything else in yoga, is a choice. It’s your choice.’